Saturday, December 25, 2010

A Very Merry Christmas


Merry Christmas, to all my quilting and sewing friends! I had a very lovely day though I didn't have any time for quilting or sewing. However, I received some very appropriate gifts.

Sister #1 surprised me with two quilt-related gifts.

The first was a Christmas stocking made out of a Double Wedding Ring cutter quilt. The woman she bought it from told her that it needn't be used only on Christmas Eve. For example, she herself had hung one, filled with long kitchen implements, in her kitchen as an object d'art. (Personally, I would never display textile art in a kitchen unless it was highly washable since it would be exposed to both moisture and grease.) I plan to hang mine in my sewing room. The second gift, which you can also see in the picture, was a framed, vintage quilt block. I believe this pattern is called Oak Leaf & Reel. I might hang this one in my living room -- just so visitors will know that a quilter lives here. (Though I suppose that the cutting table in the living room would also be a clue.)

As you know, I've become very interested in vintage patterns, so I was also delighted with the apron which Sister #2 made for me from McCall's 1713. She sent me this picture a couple of weeks ago asking if I thought our mom would like it as a Christmas gift. I replied so enthusiastically that she also made one for me and another for Sister #1. (Different colors, of course.)

Maybe I'll wear mine tomorrow when I sit down to sew. (I've yet to start my half-square triangles for RRCB.)

Wednesday, December 15, 2010

Bagging Bears

I'm taking a break from the mystery quilt right now while I pack the Christmas presents for Fillius Major and his family who live on the other side of the country.

None of the grandchildren are getting handmade gifts this year, but I'm making fabric gift bags for two of them because Teddy Bears are very hard to wrap.

Miss Strawberry Bear has just tried on her bag for size. She finds it very comfy. Master Blue Bear clutches his light saber somewhat anxiously. He's worried about whether the chili pepper fabric is masculine enough for a Jedi-bear's traveling bag. (Isn't that light saber cute?)

I'm not the sort to waste good quilting fabric on a project like this. These are Walmart fabrics which I bought at least a year ago intending to make aprons. But after I'd prewashed them, I discovered that they were too thin and too prone to wrinkle for almost anything I'd like to make.

But they're certainly good enough to make "green" Christmas wrapping. I'm just happy they're leaving my stash, and who knows -- perhaps my gift bags will be reused and passed around among family members and friends. Hmm... I've got a 20% off your entire purchase coupon for Jo-Ann's, and the Christmas fabric is probably marked way down. If I wanted to go green with gift bags next year, now would be the time to stock up.

(Oops! Didn't mean for that to sound like an advertisement. Just thinking aloud.)

Thursday, December 9, 2010

Ugly Fabric Update

Okay, I concede the title of "Queen of the Uglies" to Lisa at Inspired Quilter for her house fly fabric. The house flies on it win for their more detailed legs and abdomens. Plus, her fabric has stripes! Congratulations, Lisa. Do go over to her blog and take a look.

Tuesday, December 7, 2010

Repulsive Fabric

Bonnie Hunter has been urging us not to confine ourselves to bland and safe fabric choices as we string piece our Step 3 blocks. As long as a fabric has a white, cream, or even beige background, it counts as a neutral.

And to encourage us to loosen up, she suggested that we post our weirdest neutrals. I figured mine were too mundane to post -- until tonight. What was I thinking when I bought this? Eeeeeuw!

I hate house flies.

So I lost no time in attacking them with a rotary cutter, and now those little vermin are in 1.5 inch strips. I hope they won't make my quilt look too unsavory, but at least they're out of my stash.

Friday, December 3, 2010

I Was Right!

My hunch was correct! We're string piecing the neutrals into 8.5" blocks. This should be fun and easy, especially in the evenings when my middle-aged eyes don't see very well.

Bonnie recommends using old phone book pages for our paper foundations. But I worry about the ink transferring when they're ironed. So I'm going to cut my squares from pattern-tracing tissue paper. I've got a whole roll of the stuff. (I also do garment sewing.) It's thin and is easy to tear away after stitching.

In my first paper piecing project (which was about eight years ago), I made the mistake of using 20 lb. printer paper. Well, they say there's no teacher like experience, and it's true. I'll never do that again. That stuff was not only hard to rip out, little bits of it were left inside the stitches and I had to pull them out with tweezers. It turned me off from paper piecing for a long time and made what was supposed to have been a fun, quick project into tedious drudgery.

When I cut out my paper foundations, I plan to use my quilting rulers and an old rotary cutter with a dull blade. It's good enough for paper and much quicker than scissors!


Wednesday, December 1, 2010

Jury Duty -- Reprieved!

I was supposed to be on jury duty today. But when I called in last night, their automated system informed me that I am not needed. So I've got a free day which I plan to devote to Bonnie Hunter's mystery quilt, "Roll, Roll, Cotton Boll."

Here is a photo of some of my Step One units. (Note the cotton boll fabric!)

What's interesting is that even when I'm not sure how well certain fabrics will look together, once they've been sliced into Step One Units I just love them -- they look so cute!

I'm going with Bonnie's color scheme: pink, green, and chocolate brown. My browns are mostly Civil War repros. The pinks are all over the map. I've got some Civil War double pinks, some mauves which I bought back in the '80s or '90s, some perky pinks from my '30s repros and some very modern pinks. Ditto with my greens, most of which are from the yellowish side of the color wheel. But I've also included a few medium or forest greens as a relish.

[Well, there was supposed to be a photo of my fabrics here, but the digital camera is not co-operating. Instead, it's giving me a picture of a spaghetti squash which my son split open. He discovered that one of the seeds inside had sprouted. Why is it green? Don't plants need sunlight to do their little chlorophyll thingy? It's pretty dark inside a squash.]

By the way, I was rereading Bonnie's yardage requirements for this quilt. She calls for "assorted neutral scraps from strings, to strips, to scraps, to FQs to yardage" and the more variety the better. The mention of strings and strips really piqued my curiosity. I wonder if there is going to be some string piecing in this pattern?

Saturday, November 27, 2010

Black Friday at the Quilt Store

Well, yesterday was the 25% off Early Bird Sale at our local quilt store. Clutching my $25.00 gift certificate, I was there bright and early at 7:45 AM, the lone car in the parking lot. Where, I wondered, were all the shoppers?

I never go shopping the day after Thanksgiving because I don't want to face the frenzied madness, the crazed crowds in full berserker mode. Surely no consumer goods could be worth visiting the mall on that day. Besides, the malls don't hold anything I want to buy. My wants are few: books, fabric, and maybe a few sewing notions such as needles or thread. (Okay, if Santa wanted to bring me a long-arm quilting machine or a cabinet for my Bernina, I would not say him nay. Heck, he's even welcome to magically enlarge my sewing room. (Oooo! Wouldn't it be great to have a tardis sewing room, bigger on the inside than on the outside?) But alas! I think I'm too old to expect a visit from him.

However, I am sewing Bonnie Hunter's new mystery quilt, "Roll, Roll, Cotton Boll," and my stash is a bit lacking in certain colors and shades. Money is tight, but perhaps by braving the Black Friday crowds, I could make it stretch a bit further.

Only one other person had joined me when the doors opened at 8:00. I made a bee line for the corner with the Civil War fabrics and started grabbing chocolate browns and double pinks. I was hoping for fat quarters in order to maximize the number of prints for my money. But there weren't that many, so I began to pull bolts while I considered whether I'd better buy quarter yards or half yards. Quarter yards would give me more prints for my buck, but as the Mystery progressed, I might find myself regretting the limitation of having only 9 inches on the straight grain. As I was mentally dithering over my tower of bolts at the counter, the clerk asked, "Do you want fat quarters from these?" My jaw dropped.

"But, but . . . you don't cut fat quarters from the bolt do you?"

"Sure we do. If it's not too busy." By this time some nice yellow-toned greens had joined my pinks and browns, and I'd planned to weed through the pile of of bolts before having anything cut. But I was now so exhilarated by their cutting policy that I recklessly cried, "A fat quarter of everything!"

While cutting my fabric, the clerk inquired about the quilt I was making, and I'd just begun to describe Bonnie's mystery quilts when a voice behind me exclaimed, "So this is where all the browns are! And the pinks -- I need some of those pinks!" Yep, she was working on Bonnie's quilt too. Together we told the clerks at the cutting counter about Bonnie Hunter, the free patterns on her website, and her wonderful mystery quilts.

My new-found quilt sister ended up buying the fat quarters left over from cutting mine which made the shop very happy. I spent a bit more than I'd intended to (a few neutrals from the fat quarter bin joined the stack because you can never have too many of those, right?), but with the discount and my gift certificate I saved quite a bit. And now I'll have an amazingly scrappy selection for my quilt.

So after a quick preshrinking session, I'm looking forward to cutting and sewing Clue #2.

My goodness, Black Friday wasn't so hard after all!


Sunday, November 21, 2010

My Quick and Dirty Quilt Repair

While I was cleaning up my sewing room last week I found some old quilt photos.


The handsome young man on the left is my eldest, Fillius Major, when he was about eleven or twelve. The figure on the right is my 20 years younger self. Together, we are holding up our first and only joint sewing project, a quilt which we made for Grandpa Jack. After suffering many strokes, he had just entered a nursing home.

Grandpa Jack was my husband's father, and our kids were very close to him. So this was a sad change for all of them, but particularly for Fillius Major who could remember when his grandfather had been active and vigorous. I thought that making a quilt for Grandpa would not only be a useful gift, but a tangible way for us to express our love for him.

Fillius Major chose the fabrics, and I sliced them into squares with my rotary cutter. He sewed together some of the patches; I did the rest and attached the borders. A beginning quilter, I couldn't decide whether to tie or quilt this project -- so I did both, running diagonal lines of machine quilting through half of the squares and putting yarn ties in the middle of the others. Fillius M. made a presentation block for the lower right hand corner which he decorated with permanent fabric markers.

The gift was a great success and saw much hard use -- first in the nursing home home, and later by Fillius Major's kids. (The quilt passed to F.M. after the death of both grandparents.) Through the years it would come back to me for minor repairs and I would cover small holes with applique. (Hearts are easy! And that circle on the blue square is a planet I cut out of a piece of astronomical fabric.)

But the poor Grandpa Quilt (as the grandchildren call it) is now on its last elbows. One of the squares had simply shredded away. Another was beginning to shred. There was a rip along the edge of another block. (I must say that it's been interesting to see which fabrics have held up and which haven't. Both of the prints that shredded were fabrics that I gotten from Grandma's stash, so they were older to start with. Maybe that's why they didn't hold up.)


This quilt was woefully under-quilted which I think accounts for the stress the fabric suffered as a result of so many washings. Some of the lines of quilting had broken over the years, and the yarn ties had shriveled up and pulled through the fabric.

And here's the reason we should always use double binding on our quilts:


As you can see, the outer layer of the binding wore out, but the inner layer is still intact. (Yeah, I did a pretty crummy job of attaching the binding by machine. But it was the first one I'd ever done.

I decided that given the quilt's poor condition, a quick and dirty repair would be appropriate technology. The first thing I did was to replace the disintegrated patch. I still had some of the same fabric in my stash. Though old, I was sure it would last at least as long as the rest of the quilt. I just slid the square under the edges of the other patches and machine stitched it down.


I did the same for the other shredded patch. The block with a rip at the seamline was mended with a line of zig-zag stitches. And then, hoping to stabilize the poor quilt, I ran lines of machine quilting through the blocks that had originally been tied. Yay, walking foot! (I didn't have one of those when I originally made the quilt.) The minimal quilting I'd done in the border was broken here and there. So I echoed the original line of stitching and then bundled the quilt into one of those nylon Priority Mail envelopes, sending it off to Ohio for the grandkids to love and play with again. This is probably its last repair.

Someday it will be laid to rest in pieces, but I won't feel sad. It's been interesting to see how well (or how poorly) different quiltmaking techniques have stood the test of time and hard use. I am happy that the quilt has been so well loved, and given the improvement of my skills since then, I feel confident that my current quilts will last longer and hold up better.

Thursday, November 18, 2010

In Search of Pink

Bonnie Hunter just posted the first clue for her new mystery quilt: Roll, Roll, Cotton Boll. Since she's on the east coast and I'm on the west, I got to read it "early." (It was around 10:30 Pacific Time when it occurred to me to check her blog.)

I love sewing Bonnie's mystery quilts, but this time I had pretty much resigned myself to watching the fun from the sidelines because I didn't have any double pinks. I've got a good selection of chocolate browns, and a lot of great greens, oodles of neutrals, but very few pinks of any sort. (Yeah, I know we can substitute other another color scheme, but I didn't feel confident choosing one until I could actually see what the quilt was going to look like.) And running out to buy new fabric right now is not an option.

I briefly flirted with the idea of using my '30s fabrics because most of my pinks fall into that catagory. But I think they'd look odd with the chocolate browns I have. Then I remembered my Ohio Star stash.

Ages ago I decided that I wanted to make an old-fashioned looking Ohio Star quilt and set aside a bunch of fabrics for it. Well, I never got around to making that quilt, so I forced myself to raid that drawer and scored a few more pinks. (Also some more really cool greens and browns.) Then I pulled out all the pinks from the rest of my stash and tried to decide which of them would play nicely together. A couple of the '30s reproduction prints might work. And wouldn't it be cool to include this cotton boll fabric? The rest are mostly from the '80s and '90s and some of them read more burgandy than pink.

And then it struck me: I have a $25.00 gift certificate for the local quilt store! Last month seven stores held a Halloween Shop Hop. And every store you visited entered you into a drawing for a gift certificate. I'm a freeway wimp, so I was only able to visit two of the nearest shops. I didn't buy anything; I just looked about, soaking in the inspiration and fondling the bolts of fabric. So you can imagine how flabbergasted I was when I was notified that I'd won the drawing. Yes -- I'm buying me some more pinks! (If there's a patron saint of quilters, I definitely owe her a candle.)

Update: I just realized that I should also search through my two bins of fabrics that have not yet been preshrunk. Maybe I'll find some pinks in there. (It's not stored with the rest of my stash, so I forgot about it.

Monday, November 15, 2010

Star of Wonder

I just got an email from Zazzle that they are having a one day sale on greeting cards: 50% off and free shipping! Fillius, my son, is selling his Christmas card there. He did the artwork on his computer and the verse inside is from G.K. Chesterton's The House of Christmas. I think they're rather nice, but I'm his mother so I may be just a teensy bit biased. Here's the link, and the discount code is ZAZZLECARD50. The sale ends at 11:59 PM (Pacific Time) tonight. (Of course, you can still buy them after the sale is over, but they won't be as cheap.)

Other news: I've decided to do Bonnie Hunter's latest mystery quilt, Roll, Roll, Cotton Boll, but I won't be starting it on November 19th when everyone else does because I can't figure out what colors to use. Usually I'm happy to imitate Bonnie's colors -- her taste is so like my own. But I don't really have many pinks right now and I can't afford to buy any new ones. So I'm going to wait until I know what the quilt will look like in hopes that the finished design will inspire my color muse.

In the meantime, I'm cleaning up my sewing room so as to have room to swing my cat once inspiration strikes. And I am finding the most amazing things! I'm looking forward to taking photos of a few of them this evening which I'll be posting here on the blog.

Tuesday, October 26, 2010

Hexagons: Bonnie Shows All!

If you don't already follow Bonnie Hunter's blog, you've simply got to click over to her tutorial on paper piecing hexagons. It's the best one I've ever seen. Bonnie has a real knack for combining words and photos into easily understood instructions. I already use the same basting method she does (where you sew only through the fabric, but not through the paper pieces). However, Bonnie has an interesting way of basting a hexagon and then adding it to the project without ending the thread. And I really appreciated seeing the order in which she adds new pieces and how and when she ends her threads. I think I may revise my modus operandi a bit.

By the way, even if you're not interested in paper piecing as such, you should look at her tutorial just to see her incredible hexagon project. It will knock your socks off. I wish I could show it to you, but I'm afraid it wouldn't be kosher to repost her photo here.

Work on my own long-term hexagon project has been picking up lately. Fillius and I have gotten back into the rhythm of reading aloud every evening. So I hand stitch while he reads to me. He's just finished reading They All Laughed by Ira Flatow, a collection of the stories behind some of the great inventions that have changed the way we live today. Would you believe that the very first fax machine was invented in the early 19th century by an Italian priest? (But it didn't catch on.) And you wouldn't believe how many artificial sweeteners were accidentally discovered when early chemists tasted unknown substances!)


Wednesday, October 13, 2010

Unexpected Bargains!

For various reasons, I've been on a Do Not Buy Anything program for the past few weeks and I've successfully resisted all kinds of shopping temptations. But every now and then you stumble upon a bargain that you really can't afford to pass up.

The first one was at our church's yearly festival last Sunday. At the White Elephant booth I found a brand new plastic scrapbooking case for only a dollar. (They're usually $8.00 or $9.00 in the local stores.) I use them for storing sewing and quilting projects. As they are 14 inches square, 12-inch blocks, such as my string-pieced eight-pointed stars, fit perfectly in them. They're also handy for keeping together all of the sub-units of a particular quilting project, such as all of the 3 inch Nine Patches and Rail Fence blocks I've made for my Carolina Crossroads quilt. These cases also come in handy for garment sewing. They're perfect for keeping together the pattern, notions, thread and fabric for each project.

I found the second too-good-to-be-missed bargain when I was tagging along with my mum on one of her thrift store expeditions: an Ott-Lite floor lamp for only $10.00! For anyone in the quilting world who doesn't already know this, Ott-Lites are amazingly expensive lamps which shine full spectrum light upon your work. Not only is this handy when trying to choose colors, but it helps my poor, middle-aged eyes to see what they're doing when I stitch. Now I can sew in the evenings as easily as when morning sunlight is streaming through my window. Yay!

Tuesday, September 28, 2010

I Meant What I Said . . .


Here is proof positive that I meant what I said on Saturday. Conquering the demon of Procrastination, I unsewed the defective four-patch.

Then I replaced it with a new one and closed up the wound I'd made in the already finished row of blocks. Whew! I feel so much better now, and I'm eager to assemble the remaining rows and get this quilt completed in time for cold weather. (Which, here in Southern California, will not be soon. We're having another heatwave; the high today was 111˚!

Speaking of cold weather, my son and his family have just moved to Ohio where the nights are already chilly. Having just come from Texas, they are seriously understocked with blankets. What an incentive for Grandmama to make more quilts! (Though at the rate I work they probably wouldn't be ready until next winter.)

Monday, September 27, 2010

Featherweight Memories

I love getting packages in the mail -- especially when the contents are quilt related!

Fillius Major (my oldest son) sent me a box of shirts he was weeding out of his wardrobe. He and his family are moving from Texas to Ohio for a new job. But in the midst of packing, preparing his house for sale, and getting ready to fly with five children, a wife, and two cats, he thought of his Aged Parent and her Make-a-Quilt-From-Seven Shirts project.

Fillius Major has always been a good quilter's son. When he was still a teen, he helped me find a Singer Featherweight. The whole family was in the car at the time, my husband at the wheel. I was slumped in the front seat, and though I can't remember the circumstances, I do recall that I was in a black mood.

"Uh, Mom . . ." Fillius M.'s voice broke through my emotional fog. "Do you still want one of those little black sewing machines?"

"Why?"

"That yard sale we just passed -- they had one." Yard sale? I'd been so sunk in gloom I hadn't even noticed it!

Without a word, my Excellent Husband executed a masterful U-turn, and we were back at the yard sale while I was still trying to collect my wits. And there it was: a Singer 221, a.k.a. The Perfect Portable. It had no carrying case or attachments, and the bobbin case was missing. But the foot pedal was still attached. The machine appeared to have been much used, but not abused.

Hesitantly, I approached the woman who appeared to be in charge of the sale. She looked like a burnt-out refugee from a hippie commune and spoke in a vague, disjointed manner. The Featherweight, she said, had belonged to an elderly relative. It was obvious that her descendant didn't know much about sewing machines. When I pointed out that the bobbin case was missing, she helpfully went indoors and brought out another one from a different brand of machine. Since she seemed determined to shove it in somehow, despite her lack of hand-eye coordination, I waved her away and offered to buy the machine "as is," hoping that she wouldn't ask more than I could afford.

She was firm about the price: $25.00.

I paid it gladly, even though I could not be sure that the little guy would even work when it was plugged in. Then I hustled my new baby into the car before she could change her mind.

My spirits were high as my husband deftly wove his way back into the late afternoon traffic. Thanks to the Internet, I was able to replace the missing bobbin case (though it cost me more than the machine itself). And the local quilt store was able to direct me to a good sewing machine tech who specialized in old Singers. Eventually, I even bought a stitch plate with seam markings to replace the unmarked original.

In a way, I guess that Fillius Major was my Featherweight's godparent. Perhaps, in his honor, I should stitch the Seven-Shirts-Quilt on the Featherweight.


Sunday, September 26, 2010

Dang! Spiritual Battles in the Sewing Room

Okay, so I was sewing on the Bricks & Stepping Stones quilt, connecting the completed rows of block. And as I was pressing the seams to one side, I discovered that one of the small black squares had a hole in it. I have no idea how it got there. Itinerant moths? Most likely that tiny hole was already in my fabric strip when I cut it into squares. But the thought of having to rip that unit out of a quilt so near completion is disheartening. I just rolled it up and went off to procrastinate with my laptop.

I love quilting, but in every project I seem to reach a point where it's hard to go on. Either I've got to correct a mistake, or I've got to trudge through a boring stage of the project, or there's a "hard part" that I'll love having done, but I dread actually doing it. There's nothing for it but the virtue of perseverance, a virtue which is in short supply in my sewing room. (It's not something that you can stock up on when you've got a 50%-off coupon from Jo-Ann's.) I know I need to just pick up my seam ripper and have at it! But like St. Paul, I do neither what I want nor what I ought. Instead, I spent much of the evening just clicking around the Internet. What a waste!

I guess my spiritual muscles are as weak as my physical muscles -- and both from lack of exercise! Okay, tomorrow after Mass I will square my shoulders and march back to the sewing machine, invoking St. Michael as I pick up my seam ripper. I will think of it as a tiny little sword. Who knew that a quilter's sewing room might actually be a training ground for larger battles in the greater world?

Friday, September 17, 2010

I Dabble in Heirloom Sewing

The new stitch plate for the 1130 came in time for my heirloom sewing class today. And as it turned out, I needed those inch markings for the class, so I was glad it arrived in such a timely manner. (I'll also try using the new stitch plate on the B&SS quilt tomorrow to see if I can get the same seam allowance as the 1530 was giving me.)

Although I prefer quilt making to garment sewing, I adore learning new sewing techniques. So I had a lot of fun today at the Heirloom Technique workshop held at The Fabric Patch today. It's a prerequisite for the Heirloom Blouse class which I also intend to take. Both classes are taught by Donna Lasky, a fantastic teacher who really knew her stuff. (She was trained my Martha Pullen.) She kept us hard at it, but I enjoyed myself so much that, when we were done, I was surprised to find that we'd run two hours over the allotted class time.

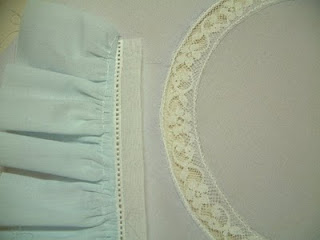
As we worked through the different techniques, we assembled our samples into a notebook, recording our own customized sewing machine settings for each one. (BTW, the samples pictured above are still unfinished. I need to take the basting stitches out of the blue one and I still need to do entredeux stitches around the shaped lace circle.)

Some of the women in the class were wishing they had granddaughters to sew for. I have four granddaughters, and I love to sew for them. But I don't think I'd make them heirloom dresses. For one thing, I can remember how boring it was to wear fancy clothes when I was young -- dresses that were "too good" (and often too uncomfortable) to play in. I'd rather make them things they can have fun wearing. But for another, I'd rather sew them dresses that will not engender regret on my part no matter what happens to them.

For my darling granddaughters (A.K.A. "The Wild Girls") are probably not as docile and inhibited as I was about taking care of a Special Occasion dress though they do love wearing pretty dresses in which one can dance and twirl. But sometimes princesses just gotta climb trees!

When I was at Upland Vac & Sew, where I bought some supplies for this class, one of the staff told me about a customer who had made her granddaughter a very fancy heirloom dress for Easter which represented 100 hours of painstaking work. The little girl wore it on Easter morning while riding the brand new Big Wheel which her father had just given her. The skirt of the dress got caught and ripped, wrapping itself around the axle as she merrily continued to pedal. The child was not fazed in the least. "Don't worry. Grandma can fix it!" I find her confidence heartwarming, though I can't help wondering if Grandma's heart didn't stop for a moment.

But wouldn't it be fun to make a christening gown? Or a bridal nightgown? Or an old fashioned, romantic blouse? And I look forward to occasionally using some of these techniques to embellish fun-to-wear but relatively sturdy dresses for my beloved Wild Girls.

Tuesday, September 14, 2010

Bernina Woe!

I was zipping through the Bricks & Stepping Stones quilt when I noticed something odd: the straight stitch on my Bernina 1530 had metamorphosed. It was still a straight stitch, but instead of the usual 12 stitches per inch, it was churning out about 24!

When I tested the other stitches, the machine behaved very erratically. Sometimes they were sewn out properly. Other times the machine attempted to sew them backwards. And frequently it stitches nothing but gibberish. Since it's a computerized machine, I assume it's a problem with the board. Woe!

When my beloved 1090 suffered a disaster two years ago, I could not afford to get it fixed. Now that the 1530 has Alzheimer's (which is sure to be a pricey repair), I've fallen back on the 1130 which my sister gave me when she was cleaning out her garage. I'm scheduled to take a class in heirloom sewing techniques this Friday, so I've been trying to familiarize myself with the 1130 and making sure that all the stitches work properly.

Unfortunately, the guide lines on the stitch plate seem to be metric so I can't get an accurate 1/4" seam.* Though I've discovered that by adjusting the needle position one click to the left, I can approximate a 5/8" seam. I called in an order for an American stitch plate (relatively inexpensive), but until it's delivered I'll have to content myself with garment sewing.

----------------
*Yes, I do have a #37 foot, but I get better results by using the guidelines on the stitch plate.

Friday, July 16, 2010

All Bonnets and Aprons Finished

An unexpected visit to Texas allowed me to hand deliver the bonnets and aprons to my granddaughters. Here are the girls posing in front of their playhouse. They adore dress-up games, and were so eager to play "Laura & Mary" (from Laura Ingalls Wilder's "Little House" books) that, despite the heat and humidity, they donned long-sleeved dresses for a more authentic look . Of course there was a bit of a tussle between the two older ones over who would get to portray Laura. (They compromised on being Laura and Laura's friend; poor Mary was sent off to college.) Fortunately, the youngest girl was quite content to be Carrie.

Their baby brother was heart broken that he did not receive a bonnet -- he likes to do everything the older ones do. But he seemed to have recovered his equanimity by the time we took the photograph.

The next time I want to make pioneer headgear, I think I'll try the Slatted Sunbonnet pattern posted by Elizabeth Stewart Clark. It's a PDF file which includes a chart for drafting sizes that will fit infants, toddlers, girls and women. The reason I didn't use her pattern this time was that you have to take the slats out when you wash the bonnet. (The slats are usually card stock or pasteboard and serve to stiffen the brim.) I thought that might be a bit of a hassle for their mum, though on another website it was suggested that if the slats were made of thin plastic (perhaps quilter's template plastic?) that it could stay inside the bonnet and survive going through the wash. Personally, I wonder if the sewn-in plastic wouldn't stress the fabric and cause it to tear while in the washing machine. And you wouldn't be able to iron the bonnet afterwards for fear of melting the plastic.

But I guess it will be a bit of a while before I do bonnets again.

Next up on the sewing agenda:

1) Finish the Bricks and Stepping Stones quilt.
2) Sew something I can wear to work as most of my stuff is either worn out or doesn't fit any more. (Monday will be my first day back on the job since the foot surgery.)

Wednesday, June 30, 2010

A Lucky Find

No, this is not my dirty laundry even though I do plan to wash it. My mum and I went thrifting today, and I finally hit the jackpot.

We had stopped by the Assistance League Thrift Shop on our way home from someplace else, and while my mother worked her way through the racks of clothing, I idly flipped through the sewing patterns and pawed through the fabrics and linens. Nothing really exciting. However, I bought two mildly vintage patterns, McCall's 8335, which was published in 1966, and Butterick 6037, which is probably from the mid-seventies. I already have plenty of patterns, but lately, whenever I find a vintage pattern, I react the same way Huck Finn's father did whenever he encountered a chicken.
Pap always said, take a chicken when you get a chance, because if you don't want him yourself you can easy find somebody that does, and a good deed ain't ever forgot. I never see pap when he didn't want the chicken himself, but that is what he used to say, anyway.
Except that I always pay for my chickens -- er, patterns -- before I take them home. (They were only 25 cents apiece!)

Then I saw the sign -- "Fourth of July Sale." All clothes and shoes and were marked down to $1.00. Hooray!

How often I've read with envy those posts on Quiltville Chat from ladies whose local thrift stores sell men's shirts for a song. Some even sell them by the pound. But the shops in our area often want as much as $5.00 per shirt.

I've been wanting to make this thrifty quilt for quite some time. Now if I can just find a couple of light shirts at a yard sale, I'll be good to go.

=================

By the way, the feline blur is our tabby, Priscilla, who takes her job as a fabric inspector very seriously.


Tuesday, June 29, 2010

Apron and Bonnet Progress -- Or Lack of It!

I thought I was going to be finished with the second of the prairie aprons and sunbonnets today, but I made an annoying mistake on the inside of the brim which is going to call for some "frog-sewing." (Rip-it, rip-it!)

My problem is that I tried to modify the lining of the bonnet brim, and now it doesn't fit. Sigh! I think I have trouble altering garments because I find it so difficult to visualize in three dimensions. Quilts, being two dimensional, are so much easier to design, sew, or modify.

(The purple and lavender floral to the right of the apron is the print I'll be using for the next one. It looks rather washed out on this photo; it's really brighter than it appears.)

Since reverse sewing always makes me downcast, I decided to take a break and do the hand work on the inside of the apron's waistband.

Friday, June 18, 2010

Hand Piecing


Here's the other hand piecing project I worked on while I was recovering from foot surgery. It's called Bride's Pride, and I got it from the June 1978 issue of Quilter's Newsletter Magazine. This issue was published back in the Precambrian Period which means that the templates were printed without seam allowances. Yes, boys and girls, I traced them onto translucent template plastic and carefully inked the match points with a fine-tipped Sharpie marker. Then I traced around each template on the wrong side of my fabric with a pencil, added a 1/4 inch seam allowance, cut out each patch with scissors, and stitched them together by hand.

Why, you may ask, would any quilter-- here in the technological vastness of the future -- go to so much trouble? Personally, I always thought I'd be one of those "life is too short for hand piecing" kinda gals until I discovered this little secret: piecing curves is far easier by hand than by machine. Hand piecing is also portable and can be easily done in bed (or other locations where a sewing machine would be inconvenient). And there is something inherently satisfying about making things "from scratch."

But if I'm going to invest the time to piece by hand, the project has got to have some sort of "wow" factor such as curves. That's why once these blocks are finished, I'm thinking of joining them by machine. (Straight seams -- ho, hum.) But I'll definitely do the quilting by hand. And when it's finished this quilt will go on my bed. (That's why I'm leaving out the hearts that are supposed to be appliqued in the white space where four adjoining blocks meet. No bridal motifs for this widow's bed!)

By the way, making templates is my least favorite part of the process. I recommend the nice metal templates made by Ardco. I wish they'd had this particular pattern.

Thursday, June 17, 2010

Would Captain Picard Choose a Bernina?

Had it not been for Doug at Savage Chickens, I would not have known that yesterday was Captain Picard Day.

(I would so love to have this on my sewing room wall!)

And it brought back memories of my one visit to L.A.'s garment district way, way back in the '70s. I was in college at the time, and a friend of mine had entered a costume designing contest connected with Equicon. She designed a dress uniform for Uhura, something which the television show had neglected to do. She won -- and was taken to the garment district (along with some other winning entrants) by Bjo Trimble to buy fabric and patterns for their costumes. My friend invited me to tag along, and I had the most amazing time of my young life, despite the fact that I was so shy I probably never opened my mouth once during the whole trip. I'd never in such close proximity to Star Trek fandom before, and I had certainly never seen such an amazing fabric selection. I was impressed at the way our hostess could unerringly pluck a suitable pattern to be adapted for a particular costume out of a whole bin full of patterns.

As time goes by, memory fades. I can't remember if I ever saw a picture of my friend's costume after it was sewn up. I know I didn't see it at the convention because I didn't go. Equicon was always held during Easter weekend when I was busy with -- um -- a different Fandom.

Wednesday, June 16, 2010

The First Apron and Bonnet Are Done!

The first of the prairie girl outfits is finished. I sewed a size 3-4 for the youngest granddaughter using a piece of pale yellow calico from my stash. The bonnet is trimmed with a bit of lilac ribbon to match the floral print and it looks very sweet. I started on Sunday and would have finished sooner if I hadn't had to interrupt myself so often to elevate and ice my foot.

Here are my tips for sewing this pattern:

1) When fusing interfacing onto the apron waistband, put some kind of mark on one side of your damp pressing cloth so that when you go to fuse the bonnet brim, the same side of the pressing cloth will be facing down and there won't be any chance of getting stray bits of fusible onto your iron. (Don't ask me how I know!) Bonus Tip 1-a) Don't let your sewing room get so messy that you can't find the iron cleaner you bought at the last quilt show.

2)When sewing the long ties on the apron and sun bonnet, use a large wooden dowel to iron the seams open before turning the ties right side out. I just slide the dowel into the sewn fabric tube and then press the sewn end of the tube by pressing a dry iron against the end of the dowel. Then I lay the whole thing down on the ironing board and and press the long seam open. The dowel functions as a long narrow ironing board. (Don't use steam -- your fingers will thank you.) Then turn the tube right side out and do the final ironing; which will be much easier and neater than you'd expect.

3) And to turn those ties right side out, nothing beats this handy little gadget: the Dritz Quick Turn Fabric Tube Turners. This is one gadget that is definitely worth the money even if you don't get it at Joann's using one of their 50% off coupons. There's a quick illustrated tutorial on how to use it over at Sew Little Time.

4) There's a bias tape casing on the wrong side of the back of the bonnet. You're supposed to insert 1/4 inch ribbon through it which will come out through button holes in the middle of the right side of the back. Don't even try threading it through with a tiny safety pin. Use one of those double sided needles that are meant for threading serger tails back into a serged seam. Just fold the end of the ribbon in order to make it narrow enough to fit into the eye.

5) You're supposed to make two buttonholes in the back of the bonnet, and the instructions tell you to baste two one-inch squares of fabric underneath the buttonhole markings so you'll have enough thickness for a machine made buttonhole. That just sounded kind of dumb to me, so instead I cut a one inch by two inch piece of fusible interfacing as a stabilizer. Worked fine.

6) Unfortunately, as mentioned in some of the online reviews, the bonnet is runs large. The pattern I bought contains sizes 3-4 and 5-6. But there's only one bonnet pattern for that whole range of sizes! Supposedly you can fine tune the fit a bit with the drawstring ribbons in the back, but it still looks huge. I tried this bonnet on my mom who has a 21 inch head (the same size as my eight year old granddaughter). It fit her easily. Oh, well. I guess I'll just return the size 7-14 pattern I bought for the older girls. I can just use the younger girl's bonnet pattern for them. (I won't need a pattern to make their aprons!)

P.S. That's my upright vacuum cleaner posing as a dressmaker's dummy.

Friday, June 11, 2010

Grandmother's Eternal Flower Garden


Ideally, I would have prepared some handwork for my convalescence. But I was too rushed to do the machine work for the binding of my baby quilt in progress. Otherwise hand stitching the back side of that binding would have been the perfect project for my recovery period. And finishing the redwork for the other baby quilt in progress would have been a good choice too. But my sewing room is such a mess right now that I just couldn't find it!

Fortunately, I also have some long term hand sewing projects that I've been working on forever. Like Jane Austen, they never let me down because they are always at hand and ready to go when I need to take something with me to keep my hands busy.

The first is my Grandmother's Flower Garden. I started it early in my quilting career. I was at the Glendale quilt show when I fell in love with an antique GFG in a vendor's booth. It was beautifully pieced and quilted, and I instantly fell in love with '30s prints and Nile Green. Alas, the price was more than I could afford even had I been willing to fling caution to the wind. But then I said to myself, "I may not be able to buy this quilt, but I am a quilter -- albeit a new one. I ought to be able to make this quilt."

Being an omnivorous reader, I already knew that English paper piecing was the easiest way to make a GFG, and that the only skill required was the ability to sew a fine whip stitch, something I'd been able to do since childhood. As yet, I had no '30s reproduction prints in my stash, a lack I immediately set out to remedy.*

Having a specific project in mind is a wonderful justification for indulging the hunter-gatherer instincts inherited from our ancient foremothers. (I think that's why we women enjoy shopping so much!) And in the course of digging through fat quarters in quilt shops and vendors' booths, I discovered that I could also buy my hexagons ready made -- and die-cut from card stock for accuracy. And I learned that by basting through only the fabric layers at the corners, it was possible to pop out the hexagons to reuse them -- not to mention quicker and easier on the hands. I also committed myself to buying '30s repros for several years. After all, I wouldn't be able to get the proper degree of scrappiness merely by buying what was on the shelves that season!

My first flowers consisted of just a single ring of pieces around a central white hexagon. I used two contrasting modern fabrics for each unit. I'm not sure yet what I'm going to do with them, but every now and then I get them out and flip them over so that I can admire what tiny whipstitches I used to be able to make when my eyes were less -- ahem -- mature than they are now. Fortunately, I'm a quilter who is in love with the process rather than focussed on finishing the project.

The picture at the top shows some of the twenty-one Grandmother's Flower Garden blocks which I someday intend to set with white background hexagons and a Nile green "path." My mother keeps asking me who it's for and when it will be finished. (She's a "project" person.) Well, this quilt is for me, and it will be finished when it's finished.

==========
*I wonder if I've spent more on '30s style fabrics than it would have cost to sew the original antique quilt? No matter! I'll have the left over fabric which can go into countless other quilts.

Wednesday, June 9, 2010

Vintage Sewing Machines and Buttonholes

Susan at Spare Time has been writing a series of posts about Using a Vintage Sewing Machine. Currently she's demonstrating the various specialty feet. But if you keep clicking on "Show Older Posts" you'll eventually get back to the first one, Preparing where she outlines what she'll be covering.

Although I love my two, lightly-computerized Berninas, I learned to sew on older mechanicals. My mom had a Singer 500, a.k.a the Rocketeer. And the sewing machines we had in my junior high home-ec class were old Singers very much like the one Susan is writing about. (Her descriptions of needles, threading, and tension on her 15-91 triggered a lot of forgotten memories!)

I own three vintage sewing machines right now. The first is a Singer 401A. I bought it on e-Bay because it looked so much like my mom's 501. It has cams for making special stitches and I managed to find a box of attachments. I also have a buttonholer for this machine, though I have to admit that I haven't tried using it yet. It comes in a pink plastic box shaped like a football.

I also have two Featherweights:* one which I inherited from my mother-in-law, and one which I discovered at a yardsale. I've got a box of attachments for both of them, including a buttonholer. I haven't yet tried out the buttonholers for any of these machines, but Susan has just posted a detailed (and well illustrated) tutorial that will finally will finally give me the courage to attempt it. Even if you don't own one of these, check it out. It's fascinating!
================

*Um, not a picture of one of my own machines, just a link to show you what a Featherweight looks like.

Tuesday, June 8, 2010

My New Pin Cushion

When did the red tomato pin cushion become iconic?

At left is a photo of my new, felted wool pin cushion. I balanced it on edge so you could read its cute little label, but when sitting on its bottom, it's actually egg-shaped and looks rather like a short-haired Tribble.

At one time these were commonly found at quilt shows. I longed for one but when I finally decided I could afford it, they were no longer to be found. It finally occurred to me to search online and I bought this one on eBay from this eBay seller. It's so cute, and the lanolin in the wool is supposed to be good for your pins. I haven't had a pin cushion in years. When my previous red tomato wore out I bought a new one at JoAnne's, but the glue holding on its leafy green top was so thick that I couldn't poke a pin through it. So it was essentially useless. My pins slide into this wool one as if into butter.

Instructions for making your own are here, but there's no way I'd ever actually do it. And although I bought mine on eBay, I've since discovered that they are also available at Brush Hollow Studio. (Caveat: I've never ordered anything from them, so consider this as information rather than an endorsement.)

Monday, June 7, 2010

Back to Blogging

Hello! I'm finally feeling well enough to sit up and use my laptop.
One of the awkward things about foot surgery is that you spend most of the following two weeks lying down with your foot elevated -- which really doesn't leave much lap for your laptop. But now I can sit in an easy chair (with my foot propped up) and read quilting blogs. At least I can feed my sewing urge vicariously, because I have no idea how soon I'll be able to sit at a sewing machine. Using the foot pedal is not a problem. The surgery was on my right foot, and I'm already used to using the left foot when I sew. The problem is that I'm not supposed to let the right foot dangle down for any length of time. Bad for the circulation, I guess, and makes it feel prickly and swollen.

But as soon as I'm able to sew, I'm going to make McCalls 4547 (pictured above). While lying on my bed of pain, I heard from my daughter-in-law about how the three little granddaughters have been reading through the Little House on the Prairie books. Recently, they made ginger water from the Laura Ingalls Wilder Cookbook which I remember my own kids doing back in our homeschooling days. So I thought it would be fun to make sun bonnets and aprons for the girls so they could play at being pioneer girls in the back yard. (I figured that girls with lively imaginations wouldn't need dresses or pantalettes to play on the banks of Plum Creek or battle their way through the Long Winter.)

If I were making the dresses I'd be concerned about some of the construction details. For instance, the dresses are gathered at the neckline by putting a ribbon through a casing. That's all right, I suppose, for a costume which is only being worn for one night. But I can imagine that those ribbons would soon slide out of the casing or, worse yet, get pulled inside.

Sunday, May 2, 2010

Tra La!

I think that St. Anne is supposed to be the patron saint of seamstresses. If so, I owe her one. For today I was in the depths of despair and now, to quote Scrooge, "I am as light as a feather, I am as happy as an angel, I am as merry as a schoolboy, I am as giddy as a drunken man."

I did hardly any sewing last month so the Bricks & Cornerstones quilt, which was to be completed in May, is nowhere near done. But a few days ago I began sewing again hoping to at least finish all the blocks before packing up my machine for the next five to eight weeks. (I'm having foot surgery this Wednesday.) I was joining my matchstick units last night and finished about half before going to bed. This morning, after family duties were out of the way, I sat down to do the rest.

I hurriedly began stitching and then, noticing that I hadn't engaged the needle down function. I clicked on what I thought was the right button. Oops! The machine was now stitching backwards. Hastily, I cancelled the reverse function and jabbed on what I thought was the needle down button. Wrong again. The machine was now sewing a basting stitch which means that the needle only goes down to pierce the fabric every three or four stitches. Dang! I hastily canceled the the basting stitch and then found that the needle was now stuck in the up position. No matter what stitch I selected, the needle would not go down. And then it struck me -- I had been cursed by the Basting Stitch of Doom!

I don't know if the current Berninas have this quirk, but both my 1090 and my 1530 suffer from it. They have a lovely basting stitch, but if you don't use it regularly the needle will freeze in the up position. So it behooves you to do some basting at least once a month. That's easy for a garment sewer. But I'm primarily a quilter, so this preventive maintenance is all too easy to forget.

The last time this happened to me, I lived near an excellent Bernina technician who showed me a little trick for unsticking it. Unfortunately, I had forgotten it. All I could remember was that the tech's tip had something to do with gently pressing the needle clamp. Research on the Web turned up nothing except for the suggestion to run the machine for a while without a needle or thread -- which didn't work.

I am not the sort of person who enjoys experimentation. I want the security of detailed instructions that will tell me the Absolutely Right Way to do things. But finally, I screwed up my courage and began cautiously pressing different parts of the needle clamp.

Reader, it worked! (I will tell you what I did, but I must caution you that if you follow these directions, you do so at your own risk. I accept no responsibility for what might happen to anyone else's machine.)

Okay. You know that little screw that you must turn when you are changing a needle? (It's at the end of a little bar.) Place your finger on top of the bar and very gently press down. The needle assembly will lower very slightly. Have your machine set for a basting stitch and run the machine at a slow speed. The needle may or may not go down into a normal stitch. Stop and gently press the needle bar down again and then attempt to stitch. Repeat as needed. Eventually the needle will go down on its own. Remember, it's set for a basting stitch so it's only supposed to go down every fourth stitch. If it only goes down once and then gets stuck again, stop the machine, gently press the bar down, and then continue to stitch. After a while I switched to a regular straight stitch and found that the machine was sewing normally.

Hooray! I'm going to finish my blocks and any other stitching I need to do before Wednesday. Then I'll take the risk of trying the basting stitch again. Then I'll pack up the machine and put it away until I'm able to set foot to the floor again. (And I must kit up some hand sewing projects to work on during my convalescence.)

Sunday, April 4, 2010

A Vintage Apron

I'd meant to come back the next day and show you my other thrift store find, a vintage apron made of aqua gingham. It's trimmed with matching rickrack and embellished with cross stitch. Not only is it hand-embroidered, but it's also completely stitched by hand. (Click on the photos for a closer view.) I like the way the maker used the checked pattern of the fabric to evenly cut out the stair-stepped scallops on the sides. And it struck me that I could use the same method to duplicate this apron. It fits me perfectly, but I don't want to subject its delicate hand stitching to everyday laundering. I'd love to display this apron in my sewing room, and make a copy of it to wear in the kitchen.

I've been very interested in aprons ever since I saw EllynAnne Geisel's exhibit of vintage aprons at Road to California in 2009. Geisel is the author of The Apron Book which, unfortunately, I do not have a copy of. But I may try to hunt it down through inter-library loan because its mix of patterns, pictures, and anecdotes sounds like a fun read.

However, I do have a copy of Aprons of the Mid-20th Century by Judy Florence which I found at the local library's used book sale for $1.00. Ms. Florence's focus is on collecting and classifying aprons. She has a background in quilting, and it was the aprons' fabrics which first drew her into collecting them. Later, she became interested in aprons for their own sakes. I love paging through her book which is profusely illustrated and includes a whole section on embroidered gingham aprons. (But none of them have the kind of scalloped edges which mine does -- tra la!)

Not surprisingly, most of the aprons in in her book are "company" aprons which were donned only when serving a special meal to guests -- a plainer "work" apron having been used for actual protection while cooking. Company aprons, elaborately decorated and often made of such impractical fabrics as organdy, were more likely to survive their humbler, more hard-working cousins.

Ms. Florence wrote another book I'd also like to read, Gingham Aprons of the '40s & '50s: A Checkered Past. Alas! There are no cheap used copies on Amazon. Worse yet, according to Worldcat, the closest library with a copy is 220 miles away! I don't think I can get this one through interlibrary loan. Oh, well.

In the meantime, I briefly wore my new apron during Easter dinner.

Sunday, March 7, 2010

Thrift Store Patterns


A couple days ago my mom and I visited a new thrift store. I was on the look-out for vintage patterns but did not find any in my size. (I don't know how to grade patterns from one size to another. I envy people who do.) But I did buy three patterns from the '80s and '90s. (No, I don't consider those vintage. Good heaven's, I feel funny when other online pattern collectors refer to patterns from the '70s as vintage! After all, I was an adult then!)

The first was McCall's 7910 from the big-shouldered '80s. But that's okay because a size 12 would be way too big for me on top, so I have no plans to make the jacket. However, the skirt would probably fit, and that's the part I'm interested in. I like those soft pleats and it has side seam pockets, a waistband, and a side opening. (Women's clothing suffers from a lack of pockets.)


The second was Simplicity 8071 which is a multi-sized (6, 8, & 10) dress or jumper. I'd like some work dresses for around the house: something simple, durable, and easy to wear. This one doesn't have any darts so it might look kind of baggy on me. But I thought it might be kind of fun to experiment with it. And since these patterns were only ten cents apiece, I'm willing to take a chance. (Last time I had a 50% off coupon at JoAnn's I bought a bolt of muslin just for trying out and fitting patterns.)


The third was a children's robe pattern, Simplicity 8090, which will probably fit one of my grandchildren. I have some pink chenille-like fabric which was given to me and I think it might make a nice robe. And if it doesn't, well, I won't have lost anything but my time. Ditto for the other two patterns; I have stash fabric that would suit them too.

Now to find the time for garment sewing! And I mustn't neglect Bricks & Stepping Stones. Fillius's birthday is coming up in May.

Wednesday, March 3, 2010

The Lure of Scraps

I got an email last week from an old friend whom I hadn't heard from in at least a year. Was I still quilting, she wanted to know? Because if so, she had a box of scraps free for the taking. "Oh, yes," I assured her. "I am most definitely still quilting."

Is there anything more exciting than free fabric? I think not.

Even though I have a healthy stash, I'm always pleased to give it a transfusion. Prints and colors that I didn't choose, and in some cases wouldn't even dream of choosing, are frequently those fabrics that inject an unexpected sparkle in my scrap quilts, breaking up the homogeneity which I've allowed to creep into my stash.

(There were some lovely plaids buried near the bottom of the box which may be finding their way into my Carolina Christmas quilt.)

Tuesday, March 2, 2010

Scrappy Neutrals


Not much to report on the quilting front. I'm doggedly making black and "white" four-patches for my Bricks & Stepping Stones, but as you can see, I have a pretty elastic definition of which neutrals qualify as white. (Click on the picture for a closer view.) I love the one with the chickens and their little red and white eggs. I'm hoping that prints like these will add some sparkle to the quilt since most of my whites are actually pretty sedate.

Sunday, February 21, 2010

Ugly Fabric (and Photoshop)


The more I work on Bricks and Stepping Stones, the more I love this pattern. I've been using some wild and crazy prints for the bricks. Among them were wild horses racing on a green background, cowboy paraphernalia on blue, and gray manatees swimming in a turquoise sea among schools of golden fish.

The very last brick was cut from this ugly paisley, a fabric that is near and dear to my heart. It's been in my stash since the '90s when I was an active member of the Genie Online Quilter's Guild. I bought it for the annual Ugly Fabric Swap, an event which I looked forward to all year long. Sign-ups began on April 1st (April Fool's Day). Each of us pledged ourselves to send a 10 inch, pre-washed square of the ugliest fabric we could find to all the other swap members. The deadline was April 15th (Income Tax Day).

Then we would wait by our mailboxes in fearful anticipation. What monstrosities, what abominations of the textile industry had our sister quilters found? As the envelopes began to arrive, each bearing a fabric more appalling than the last, every quilter would describe her reactions online, casting her vote for the Most Appalling Fabric (often with uncontrollable giggles).

Yet truly is it said, "De gustibus non disputatum est." ("There is no accounting for taste.") Almost every fabric, no matter how clashing its color -- how hideous its print, had at least one fan whose piteous cry, "I like that fabric!" proved that beauty really is in the eye of the beholder.

Then the real challenge began: to make a really great quilt out of that year's collection of Uglies. (The secret is cutting the fabrics into small enough pieces!) Some of the quilts were stunning, and I remember at least one whose photo ended up in a major quilt magazine.

I always took part in the swap, but only once managed to finish a quilt. Most of my Ugly collections are still intact. And I'm thinking that Bricks and Stepping Stones would be the perfect pattern to display these, um, unique fabrics.

But getting back to the paisley shown at the beginning of this blog: I wanted to post a picture of it, but my digital camera is so old and creaky that it's a real pain to shoot and upload photos. So I decided to try taking its picture using the Photo Booth application on my Mac. Unfortunately, the fabric's color wasn't accurate because of the way that light shines through it.

"I can fix that!" Fillius announced. "I'll Photo Shop it on my computer."

"Oh, no," I said. "That sounds like too much work. I'll drag out the camera."

"It's really easy," he assured me. And it was. In just moments he had perfectly adjusted the color.

"Super! Email it to me." I pasted it into my blog, and while I was still typing up the text I heard Fillius calling from the other room."

"Hey, Mom! Want a picture of your fabric lying flat?"

"Kewel! But can you make it into an elephant?"

Before I finished writing my post I had his answer: