Monday, October 17, 2011

Crumb Quilt-Along #6

Last night I began working on Log Cabin blocks for the Crumb Quilt-Along sponsored by Jo's Country Junction. Here's what I learned from this phase of the project.


You can put more than one of your Log Cabin units face down on a single strip to quickly add the same fabric to all of the units at the same time. (You probably can't see the long strip very well in this photo because it's white -- just like the table.)


As your block approaches its finished size, it's a good idea to use really wide strips. Had the red heart fabric been 3/8 of an inch wider, this block would have been ready to trim.


Instead, I had to add another light strip and then off-set the ruler so that the final light strip would be triangular rather than an impossibly skinny rectangle.


 Here are two other finished blocks. A fourth one is almost done, but I need to post before leaving for work.

As Jo suggested, I'm going to use these blocks for the corners of the quilt. My colors for these are quite a bit darker than the previous blocks. Log Cabins always scream, "Contrast! Contrast! Contrast!" while I'm sewing them. So what can I do but obey?


Saturday, October 15, 2011

Crumb Quilt-Along #5

Due to circumstances beyond my control (a.k.a. "real life"), I'm a week behind on Jo's Crumb Quilt-Along. So this week I've been working on liberated blocks made with triangles. When I rummaged through my drawer of white scraps, I discovered that I had a lot of small, white triangles.

I paired them with rectangles like this and sewed down the hypotenuse of each triangle using an approximate 1/4 inch seam.


Then I cut away the excess colored fabric . . .


. . . and pressed open the resultant square.


I found that I could also pair single white triangles with any colored scrap of approximately the same size.


Here are some of the 1/2 square triangles I made:


 And here are the three blocks I finished:


I like these blocks, but even though I did them without any measuring, they don't look very wonky. I suppose that's because I started out with the precut white triangles.

I look forward to doing some Log Cabin style blocks next, and hope to be caught up to everyone else by the end of the week.

Tuesday, October 4, 2011

A Quick & Easy Sewing Machine Cover

My mom has decided to convert her second bedroom into a sewing and craft room so that she can leave her sewing machine set up all the time. 


  When I visited yesterday, I noticed her new sewing machine cover. It isn't pretty, but it keeps her Singer 500 dust free.


She made it by cutting across a tee shirt just under the sleeves and then sewing the cut edges shut. That's just one seam since the body of the shirt is a tube and there's already a hem on the bottom. Of course, that mostly cuts off any cute logo the shirt might have had since those are usually positioned on the upper chest.

I suppose you could preserve the logo by making your cut just under the neck. But then you'd have to cut down the sides in order to make a symmetrical shape. And you'd have to cut off some of the bottom because it would now be too long. And then you'd have to hem it. Too much work!

I have some pre-quilted fabric which I bought a couple of years ago in order to make a cover for my Bernina. It's still sitting in my closet because I'd much rather be quilting than sewing a machine cover. But I think even I could spare the time to make one of these.


Actually, my mom didn't spend any time at all making hers because it's a repurposed icon cover. She makes these tee shirt bags to protect her icons when she's transporting them to and from her painting class. (An icon is a religious picture painted on a wooden board.) The one in the photo, Our Lady of Sorrows, is still in progress. If you're interested, here's a link to Sacred Image Icons, the website of her teacher. (Warning: it plays music.)


Monday, October 3, 2011

Crumb Quilt-Along #4

This week we are doing Nine Patches and Four Patches. (You can see all of the steps here at Jo's Country Junction.) Usually, I can't get to my crumb project until Friday, my day off. This week I had to work on Friday, so I didn't actually sit down at the sewing machine until Sunday evening.


Fortunately, I had quite a few trimmings left from previous projects which  I thought would give me a head start on this week's blocks. Unfortunately, I was half asleep.


I'm not very satisfied with this little Nine Patch. I surrounded it with precut half-square triangles. It just looks blah. I think that the value of the inner triangles is too close to the value of the outer ones.


This little four patch is even more disappointing. Not enough contrast, I think. I put the pink half-border  on in an effort to perk it up a bit. I think I'll have to make a few more Four and Nine Patch based blocks just to prove to myself that I can do it

Tuesday, September 27, 2011

The Bad Before, Continued...

The reorganization of the sewing room is still in progress. Here a second set of pictures pictures which I meant to post soon after The Bad Before. This is my so-called living room. It's really an annex of the sewing room because the only living I do in here is quilt making. I don't even own a couch.


This buffet holds my Singer 401 on the left side; my serger is normally on the right. The drawers in the middle hold cutting and sewing supplies. The plastic boxes hold projects in progress. They're 14 inches square and are meant to be used by scrapbookers. I like using them for quilting projects because 12 inch blocks fit easily inside them. They are also useful for corralling quilt block units, such as the three hundred half square tringles I needed to make for "Roll, Roll, Cotton Boll." (I have even more of these boxes stacked in my bedroom. Eek!)


I consider fireplaces to be a waste of wall space. I never use them. Right now I've got this little cabinet on the hearth. It holds Fiona, my Singer Featherweight. 


My cutting table occupies the middle of the room. You can drop the leaves, but I never do. There are a couple of bins underneath it with fabric set aside for a particular project. Just off screen to the right are two bookcases and an easy chair that I seldom sit in because it makes me slump. I should probably get rid of it.


Here's the matching foot stool. The binders hold part of my collection of Quilter's Newsletter Magazine.  They don't fit in the sewing room any more, and I'm not sure where to put them. (The yellow Post-it notes mark the pages which have quilts I'd like to make. I don't think I'll live long enough.)

(Actually, the living room looks worse than this right now because, since taking these photos, I've pulled so much stuff out of the sewing room and just dumped it here.)

Well, now that you've seen the bad "before" pictures, I look forward to finishing my reorganization so that I can show off the amazing "after" pictures. (I hope!)


Saturday, September 24, 2011

Crumb Quilt Inspiration: The Case of the Teeny Tiny Triangles


"The true economy of housekeeping is simply the art of gathering up all the fragments, so that nothing be lost. I mean the fragments of time, as well as materials. Nothing should be thrown away so long as it is possible to make any use of it, however trifling that use may be..." Lydia Marie Child, The American Frugal Housewife, 1832.

When I read this quotation, crumb quilting immediately leapt to mind as it makes use of my smallest bits of fabric. Though I probably waste too much time rooting through my scrap drawer in search of the right color or perfect sized bit for those cute little flying geese units or star points.

Which also reminds me . . .

Years ago I bought a grab bag of scraps at my guild's Trash & Treasures meeting. The contents included a Ziploc bag of tiny right triangles. But how could I use them? I always work with preshrunk fabrics, but obviously I couldn't toss these little guys into the washer -- not even in a lingerie bag. They'd turn into a tangled mass of threads. So they remained in my stash all these years. And though I considered them unusable, I couldn't bring myself to throw them away.


Yesterday, when I was making my Wonky Star blocks, it occurred to me that these little triangles might be useful as star points. Perhaps I could preshrink them by spraying them with water and then ironing them dry. I put a piece of muslin on my ironing board and gave it a try.

Eek! The color from the triangles leached into the muslin. So much for that idea.

But what if I sewed them into something that would never be washed -- such as a pin cushion?


I'm having a go at that tonight. If it doesn't work out (and I have real doubts about what will happen when all those points meet in the middle) maybe I really had better toss them in the trash. After all, Ms. Child mentions advocates the wise usage of "fragments of time, as well as materials." 

Friday, September 23, 2011

Crumb Quilt-Along #3: Hearts and Stars

I worked more hours than usual this week, so Friday was my first opportunity to sit down with step 3 of "Crumb Along With Me" from Jo's Country Junction. Jo provided her own tutorial and also linked to Bonnie Hunter's instructions for making Maverick Stars. I decided to follow Bonnie's method, but I used 2 inch squares for the background blocks instead of 2.5." Then I added some leftover strips from my scrap drawer to bring the block up to 6 inches unfinished.


I was very pleased with the way this one came out. Small is always cute.

I had a little more trouble with the heart. I was using Bonnie's method for that too, which calls for piecing each half of the star separately and then joining them with a seam down the middle. My first mistake was making two left sides for the heart. But I just made a new right side out of a different fabric, and I now think that the heart looks better than if it had been all the same color.


However, I think I will go back and try out Jo's instructions now. Because you can't have two many piecing techniques under your belt -- right?

By the way, I am charmed to discover that that Chicky Quilts used the same pink kitty fabric for her heart that I did. And if you scroll down to the close up view of her block, that green ivy print in the corner is also in my stash!

Thursday, September 22, 2011

Unexpected Pattern Bonus

Last week I was rooting through my collection of apron patterns hoping to find one that would fit this bookish fabric I found at a local quilt store's "yard sale." I've got two one-yard pieces.


As a library aide, I am required to keep a walkie-talkie on my person so that I can be easily summoned when one of the library clerks needs a shelf check. I also need to carry my computer glasses with me. They're perfect for shelving. (If I use my regular glasses, which have progressive lenses, it's impossible to read the spine labels of the books on the bottom shelves without contorting my neck and eyeballs into strange and painful positions.) And during the month of September, the entire staff is required to keep a detailed, daily log of our activities. So I also carry around pencil and a small pad of paper.

That's a lot of stuff to shove into the nice flat pockets of my Crescent Skirt. So I thought I would make myself an apron with ample pockets. I was thinking of using view 2 of Simplicity 8563, a vintage pattern from 1969. (That's the yellow one.)


I found this pattern at a thrift store. In fact, I found five copies of it: two adult sizes and three children's sizes. And I bought them all. (Why not at at 25 cents each?) I couldn't help wondering about their history. Was it a Brownie or Girl Scout troop for which these were originally bought? Or a church group, perhaps? Or just an extended family's special event? 

Only view 1, the red apron with the heart shaped pocket, has been cut out and used. (If you click on the photo to enlarge it, you can see that the pattern comes with an iron-on transfer for appliqueing the word "Love" onto the pocket in a groovy style of lettering.)

I was expecting to use the adult size 8-10. But because patterns were sized differently in 1969, it's actually too small for me. I didn't have the 12-14, so I opened up the 16-18 to see if it would be too hopelessly large. And tucked inside the envelope was 4 1/8 yards of vintage, jumbo rick-rack -- the exact amount needed for this size. It felt like a special link with that group of unknown girls and women who had made these aprons back in the '60s.

Friday, September 16, 2011

Crumb Quilt-Along #2

Today I finally got to sit down and do my free-hand flying geese blocks for the crumb block sew-along at Jo's Country Junction. These were fun, but very slow to make. I'm trimming them with my six inch ruler which means that they'll finish at five and a half inches.


Here's a picture of the first one before trimming. I wasn't thrilled with it and resolved to attempt some smaller geese.


These geese are smaller and cuter.


Here's another photo taken after the blocks were trimmed.


I like them, especially the one with the smaller geese, but I find that I'm using more strips than crumbs. I read on Bonnie Hunter's website that she makes three and a half inch blocks. I think that would probably make it easier to use up more of the tiny scraps. Not to mention being unbearably cute. But you'd probably have to be really crazy to attempt a whole quilt made with such tiny blocks.

I was trying to explain crumb blocks to a friend when I suddenly remembered that this is not the first time I've worked on a crumb-like project. Years ago I was working on a "Mile-A-Minute" quilt, inspired by an article by Carol A. Coski in the Winter 2000 issue of American Quilter. Ms. Coski speeds up the process of crumb piecing by sewing her small scraps to a long strip of fabric and then cutting them apart to make little two patches.  These "twosies"are then rotated and sewed to another long strip and then cut apart to make "threesies. And so on and so on. Basically, you are making crazy patchwork fabric. (I tried, unsuccessfully, to find a website by the author which might explain this process in more detail. However, here's a link by another blogger giving a short tutorial for it.)

Here's a picture of the quilt top I pieced using this technique:


Here's a close-up of one corner:


The basic unit looked like this:


The sashing and cornerstones helped to stabilize the bias edges which some of the blocks had after cutting. Then I joined them into rows.

I never finished it because I decided that I'd rather have a lap quilt than a wall hanging. I even cut more sashing and cornerstones, but in all the bustle of moving (four years ago), I never got back to it. I'm thinking that perhaps I will sash the special crumb blocks that Jo is teaching us to make and add them to this quilt.

And after that, who knows? My mind keeps returning to the thought of those three and a half inch blocks. Maybe I am that crazy!

Wednesday, September 14, 2011

Ta Da!


During the past week I finished the blocks for my donation quilt and assembled them into a top. I'm trying to decide if it should have borders or not. It's only 36 inches square which is rather small even for a baby quilt. I have a dark blue for the binding. Perhaps I should make a border of the same fabric. What do you think? I need to finish by the end of October, so I can't afford to dawdle over my decision.

Sunday, September 11, 2011

A Crumby Temptation


Oh, dear! So little time -- so many enticing projects.

I just found out about the "crumb-along" which is being hosted at Jo's Country Junction. Every Tuesday for the next ten weeks, Jo will be posting "...ideas on fabric requirements, block construction, layouts and the like. You'll have a week to make 2-10 blocks a week depending on your preference and your schedule." Her goal is to make 36 six-inch blocks for a baby quilt, though participants can make larger or smaller projects as they prefer.

While re-organizing my sewing room I've become aware of just how many crumbs I have. So I'm very tempted to dive into this sew-along. (Actually, I have two other crumb drawers as well as a couple of plastic bags so the situation is dire!)

I think I might try making 3 1/2 inch blocks a la Bonnie Hunter so that I can use up my tiniest crumbs. (See her crumb tutorial here.) Then I could save the bigger crumbs for the project on yesterday's post.

Saturday, September 10, 2011

Scrappy Inspiration

I was visiting my daughter in Seattle over Labor Day weekend and, much to my delight, our trip to Bainbridge Island included a visit to Esther's Fabrics where we saw this quilt. As far as I could see, it wasn't from a pattern they were selling, so I took the liberty of snapping a photo. With its wonky construction technique, this looks like a good way to use up random scraps.

Wednesday, September 7, 2011

Sewing Room Makeover: The Bad Before

Sooner or later it comes: the day when your sewing room is so crowded and so messy that you can no longer sew in it. My sewing room has reached that stage, and I have been working to reorganize it. Here are the "before" pictures.


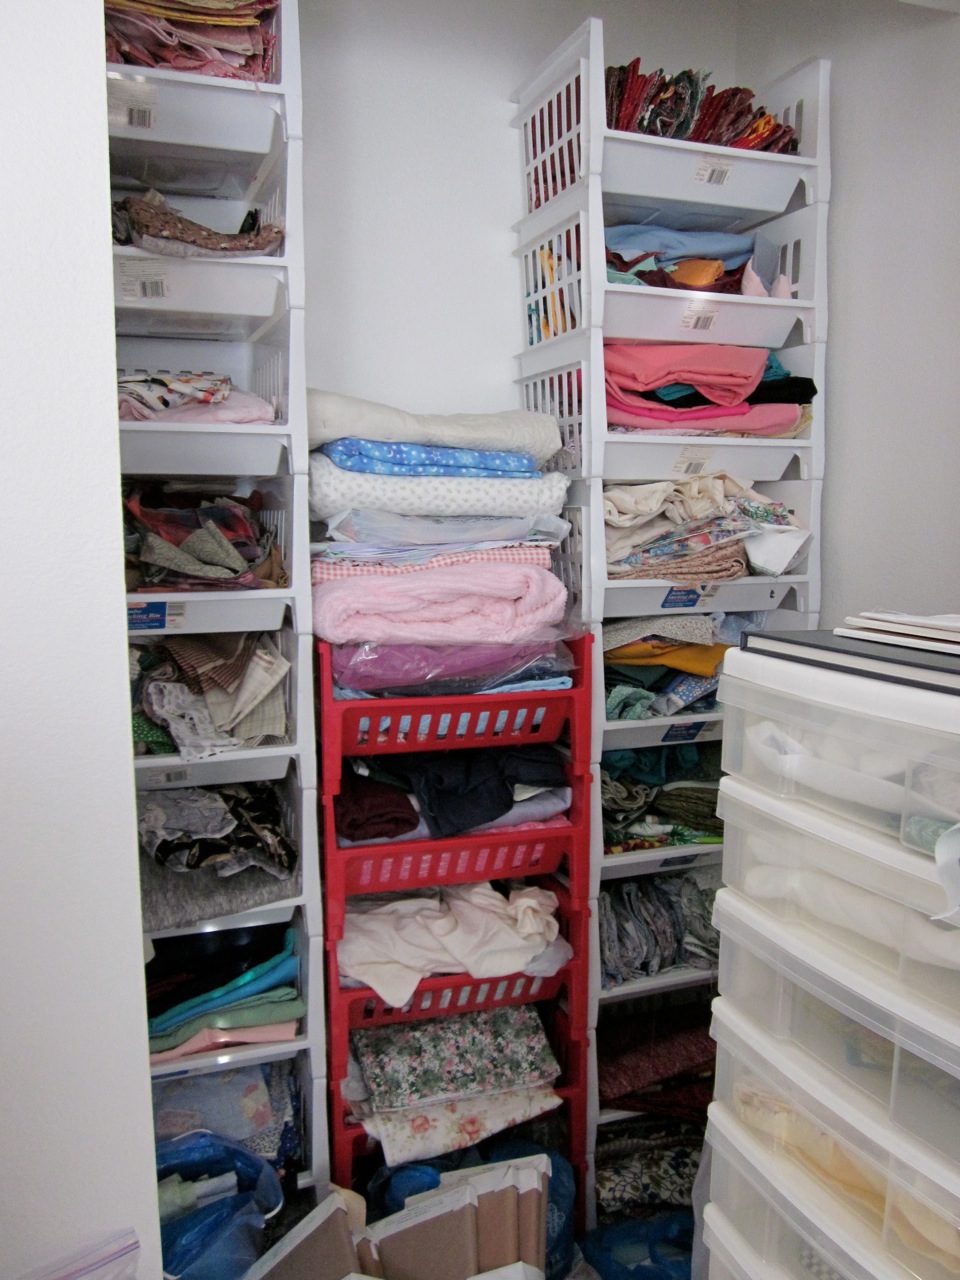
My stash is housed in stacking baskets in an alcove which used to be a closet. (The previous owner of this house removed the sliding doors.) It doesn't look that bad because you can't see the bags of fabric on the floor in front of the baskets.


As I step backwards you can see the other stuff that is in front.


Here is its true awfulness revealed. The plastic drawers have casters and can be rolled about. Theoretically, I should be able to move them for easy access to what's behind them. But it doesn't work out that way because there is so much other stuff on the floor.


Now I begin to pan the camera around the room. As you can see, this is also my library annex. The bookcases fill the entire north wall. Most of these books are children's literature, but you'll also find hardcover science fiction, some science books that didn't fit in the library proper, tall picture books, and a few homeschooling materials. On the top of the bookcase is a bolt of batting, some packaged batting and poly fiber-fill, a pillowcase filled with felted wool, and a box of photos. You can also see two of my sewing machines and my serger.


Here's the east wall. There's a six foot banquet table set up in front of the blinds. My Bernina 1530 is in a SewEzi table set at right angles to it, and there's a four foot table behind the SewEzi. I've got some short Ikea bookshelves on the south wall with a bunch of random stuff on them.


The bottom shelves of those bookcases are firmly anchored by the Encyclopedia Britannica and the Catholic Encyclopedia. The other shelves hold my sewing notions, patterns, boxes with works in progress, and some bolts of fabric I got at an amazing sale.


Here's the edge of that bookcase with my hoop, quilting templates, and rulers hanging on the wall. More stuff is piled in the corner. The French doors lead into the living room. (Why is that random chair here?)

Believe it or not, my sewing room spills over into the next room. But this is enough mess for one post, so I'll show you that tomorrow.

Monday, September 5, 2011

Back to Quilting

Lately, most of my blogposts seem to be about vintage patterns or garment sewing. But I'm primarily a quilter even though I haven't been writing about it lately. To prove it, here is a picture of my current project.


I'm not really thrilled about the fabrics, but I didn't choose them. They're from a kit put together by my former quilt guild. They were sponsoring a quiltathon during which members would spend the entire day together sewing quilts for charity. I couldn't attend, but I took one of the kits home intending to work on it in my free time. But alas! As often happens, I had less free time than I expected. This was back in 2005 when I was a caregiver for my husband who had cancer.

In 2007, when I was packing to move to another city, I discovered the still unused kit. Guiltily, I contacted the guild. They told me not to bother returning it, merely asking that whenever I did get around to sewing it that I donate the quilt to some deserving charity.

Fast forward four years.

In my new town I have frequently been invited to attend a women's group which gathers every month to do crafts, chat, pray, and listen to an inspiring talk on CD. I almost never attend because I'm usually working on the date they meet. But the time before last I was able to make it and wondered what sort of project to bring. Most of the other ladies were making items for the annual fund-raising boutique held by a nearby Carmelite convent. So I decided to sew this long overdue charity quilt as my donation.

And here is the machine I am sewing it on: my sweet little Featherweight, whom I've christened Fiona.


She doesn't get much use because I seldom sew away from home. And normally, I'd rather use my Bernina.

Yes, I know that quilters are supposed to have a mystical love for the Singer 221, but the Bernina and I are so closely bonded that it functions as an extension of my brain much the way my keyboard does. (Here imagine an android voice droning, "We are one . . . we are one . . .") In fact, it had been so long since I'd last used poor Fiona that it took an embarrassing amount of time and concentration before we could manage an accurate 1/4 inch seam.

If I'm to finish this project in time for the November boutique, I'm going to have to work on it outside of the regular meetings. Since I like to use the same sewing machine, from start to finish, when I make a quilt I guess Fiona and I will be getting much better acquainted.

Wednesday, August 17, 2011

In the Queue

Oh, dear! I've bought another vintage pattern, Simplicity 2313, a jumper and blouse from the 1940s. I bought it from New Vintage Lady's Etsy shop. She sells her own vintage-inspired patterns in plus sizes -- very cute, but out of my size range. She also sells vintage patterns in a variety of sizes. This one, a vintage size 14 has a 32 inch bust. (Vintage sizes run smaller than modern ones.) So I'm hoping it will fit without too much alteration.

On her blog, New Vintage Lady is hosting The Plain Pattern Project, a sew-along in which she challenges her readers to make one of the most plain and basic patterns in their collections at least three times by December 31, 2011. "One of the three garments should be made as close to the original designs as possible." The other two will offer more scope for the imagination.

This pattern would qualify, so I'm very tempted. But I'm probably being overly optimistic to even imagine I could make three versions of it by the end of the year.

I also want to try the 1950s Walkaway Dress sew-along hosted by the Eidelweiss Patterns blog. Originally issued in 1952, this Butterick pattern was wildly popular. Now reissued as Butterick 4790, many people have been lured into buying it by the perky and charming cover illo from the original pattern. But people who have actually made the dress give it very mixed reviews. Most complain about the fit. Interestingly, as revealed on the Eidelweiss Patterns blog, the modern version does not exactly reproduce the original pattern. The author of the sew-along shows how she restored the lines of the original bodice here, and is showing a more step-by-step version of the alterations during the sew-along.

I bought the pattern some time ago, but have hesitated to actually cut it out after reading the bad reviews of it and actually seeing a woman wearing this dress last Halloween. (Very sad!) I think I'd really like to have a go at the alterations, especially since I already have some inexpensive fabric in my stash which I could afford to devote to it. (This pattern takes nearly five yards!)

Oh, dear! For a quilting blog I've had way too many garment posts lately. Okay, the next couple of posts will be about quilting.


Tuesday, August 16, 2011

Finished the Crescent Skirt!

This is just a quickie post to report that I've finished the Crescent Skirt sew-along hosted by Sewaholic. This is not the best picture in the world because it was taken late at night by Fillius who had never used my camera before. In the original I looked like the Leaning Tower of Pisa. Thank goodness for iPhoto which also allowed me to cut off my head. (Fillius snapped the shutter while I was trying to give him instructions, so my mouth looked really weird. I mean really weird, as if an alien from outer space had taken over my body.)

While I was sewing it, I referred to this pattern as The Skirt of Doom because I kept making so many stupid mistakes. I hasten to assure you that it was not the fault of the designer. This pattern is very well designed and the instructions are clearly written. And the well-photographed sew-along was amazingly helpful.

I like the way the skirt turned out. The original is a good deal shorter. I lengthened mine because I wanted to wear it to work where I need to be able to squat down modestly to reach the lower bookshelves. The pockets were easy to put in and lie nicely flat. My fabric choice was unfortunate. I like the print, but you can't see the lovely stitching detail on the waistband. And in this photo you probably can't even see that the waistband goes down into a point. I was worried how this would look on me because I have a middle-aged tummy. Surprisingly, the waistband disguises it. And I think this skirt looks good even though I made it from a quilting cotton. It goes nicely with a tucked in T-shirt or blouse. And I've successfully worn it with with blouses designed to be worn untucked. I'm glad about that because I have quite a few of those left from my pants-wearing days.

(Just so you know: I'm not one of those women who refuses to wear pants for religious reasons. I've switched to skirts because I now have to wear support hose, and they're just too hot to wear under trousers -- even with air conditioning!)

I will definitely make this again, but not in such a busy print. I want the curved seams on the waist band to show up. Perhaps a nice, lightweight denim?

Monday, August 8, 2011

The Joy of Buttons (Vintage)

I have an embarrassingly large button stash: five metal cookie tins and a gallon Ziploc bag -- all stuffed with buttons. Most of them were inherited from my mother-in-law who was quite a seamstress in her day. She used to boast that she could come home from work in the evening and sew an entire outfit in time for her sister to wear it the next morning -- all on her trusty little Featherweight. Her button collection continued to grow even after she left off sewing because she was a bit of a pack rat who could never pass up a bargain.

My mother, who sewed a lot of dresses when we girls were young, also had an ample supply of buttons. She gave them to me during her downsizing frenzy, though she reserves the right to drop by any time she needs some.

Since my mother is 80 and my mother-in-law would have been 100, some of my buttons now qualify as vintage. Those which are still attached to their cards have such charming artwork that I doubt I could bear to use them.

My favorites are the baby buttons.

These are so tiny that I can't imagine making buttonholes for them -- at least not by machine. I suppose one might have made hand worked buttonholes that small.


Or would thread loops have been used? (They used make those by working a hand buttonhole stitch over several strands of thread.)

Here's a sultry beauty.

This must be her clean-cut boy friend.


I love the cut-out leaf design on these.


And how about these glass buttons imported from Western Germany? "Guaranteed to wash and iron." The way the color flows from pink to blue is amazing. The photo doesn't do them justice.


And here are a few loose buttons whose shapes or color I found interesting. I don't know if you can see the emblem very well, but the dark green button on the lower left is an official Girl Scout button. It must have survived my brief membership. (All I remember about the meetings was that the dues were ten cents and that we met in a room with a piano where all the other girls played Chopsticks or some other dreary two-fingered tune that went, "Bomp, bomp, bomp! Da-bomp, da-bah, da-bomp!")