Sunday, May 15, 2011

Give-Away at St. Gemma's Art & Needlework

Rebekah, the talented young woman who taught me how to alter the neckline of my granddaughter's First Communion dress when I discovered that the bodice would not close in back, is holding a Give-Away at her sewing and crafting blog, St. Gemma's Art and Needlework. (Actually, it's a joint Give-Away with her also-talented sister Catherine.)

There will be two winners and two sets of prizes. (My favorites are the crocheted roses.)

Check it out here. It's very easy to enter.

And here's a lovely video about the contest which Catherine made.


My personal favorites are the crocheted roses.

Saturday, May 14, 2011

May-Every-Day: Update

I'm not doing very well at meeting my self-imposed challenge to blog every day during the month of May.* Part of the blame may be attributed to Blogger which has been doing Weird Things to its clientele. And now my modem is malfunctioning. Verizon says that the modem is communicating with them but ignoring my computer. They promised to ship me a new modem, but in the meantime I no longer have Internet access at home.

Yesterday I dragged my laptop to the public library so that I could use their free Wi-Fi to read my backlog of email. Today I brought my computer to Borders (while Fillius spends his gift card) in hopes that I could do a little blogging.

Administrative Details: Since I'm dating my posts as if they were written consecutively, this one is dated May 14th even though it's actually May 24th. And my daily blog posts are split between my two blogs, this one and Catholic Bibliophagist.

====

Thursday, May 12, 2011

Marking and Making Tucks: A Tutorial

One of the things I had to figure out for the First Communion dress was how to mark and make the tucks on the sleeves and bodice. Usually, when sewing tucks, the pattern will have you mark each tuck with two parallel lines. After transfering these lines to the fabric, you're supposed to bring the two lines together and then sew along the lines.


But it's actually much easier to sew a tuck if you only mark a single line representing the center fold of the tuck. So my first step was to trace the pattern piece substituting a single solid line exactly midway between each of those dotted lines which you see above.

But how would I transfer the lines to my fabric? Naturally, I didn't want to use pencil, chalk or dressmaker's carbon paper on white satin. So I decided to mark my tucks with thread.


First I traced the position of the tucks onto a piece of pattern paper. Using blue painter's tape, I attached the paper onto my cutting table. Then I taped a piece of fabric, large enough to cut out the sleeve, over the paper template. I was able to see the black template lines through the fabric. (In the photo I'm using a piece of bleached muslin, but I was able to see through the satin equally well.) I sewed a line of running stitches over the marked lines being careful to sew only through the fabric and not the paper underneath it.

After thread tracing the tuck lines, I removed the fabric. I pinned the sleeve pattern piece onto the fabric, lining up the tuck lines on the pattern with the lines I had marked on the fabric in blue thread.

To make the tucks, I folded along the first blue thread line and ironed it down.


Then I sewed a seam that was half as wide as the distance between the two tuck lines on the original pattern. (Rather than do any complicated math to figure this out, you can take your original pattern piece, bring those dotted tuck lines together, and then put the pattern piece under your presser foot just as if you were going to sew a seam along the tuck line on the pattern. Sink your needle into the sewing line and see which guideline the fold falls along. Or, if your machine allows you to shift your needle position, you can put the fold against the nearest guideline and then move your needle left or right until it's in the right spot to sink into the sewing line.)


In my case, putting the folded edge at the 1/4 inch guideline on the needle plate and moving the needle to the right just one click proved perfect. To keep from forgetting the proper setting, I wrote it down in pencil on my sample sleeve.

After sewing the tuck, I pulled both threads to the wrong side of the fabric, knotted them by hand, and clipped the thread tails.


Here are the finished tucks. Once they were all done, I removed the the blue thread. No marks were left behind.


I followed this procedure with the satin, and was able to easily mark and sew the tucks without having to worry about about having to remove any markings from the fabric.

Here's a picture of the completed satin sleeve.


Tuesday, May 10, 2011

An Unexpected Sewing Aid

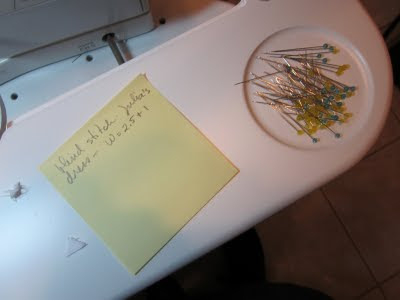
My new favorite tool in the sewing room is the humble Post-it note. When making the First Communion dress, I did a lot of samples to figure out what stitch settings or seam allowances would work best for various parts of the dress. In this case, I had to experiment with the blind stitch on my machine in order to get the most invisible hem possible.


But now that I'm middle aged, I have a brain like a sieve. So I carefully wrote the settings on a Post-it and stuck it to a corner of my sewing machine table so that when I finally got to the hem, I'd remember the stitch width that had worked best.

(By the way, the little pin cup in the corner is a feature of the Sew-Ezi table which I bought last January. I'm always careful not to sew over pins, and I find it so handy to drop the pins into that little indentation. It's much easier than trying to shove them into a pincushion.

Sunday, May 8, 2011

Next In the Queue


The closer I get to the end of a sewing project, the more I find myself thinking about what I'll work on next. Sewing the First Communion dress took so long that I'm eager to get back to quilting with its precise 1/4 inch seams and its soothing two-dimensional construction.

But my wardrobe is so scanty right now that I think I'll have to take the time to make myself a skirt I can wear to work. I'm going to try the Cresent Skirt by Sewaholic. (Tasia, the designer, is hosting a sew-along here.)

I hope this pattern won't be too young for me. I'll be making it a bit longer than the photos on the website.

Two things in particular attracted me to this pattern. The first is that it has pockets! I really need pockets when I'm at work. The second is that it is supposed to be suitable for quilting cottons -- something which I've got an awful lot of.

Last year a local quilt shop was flooded due to a plumbing problem. Bolts of fabric which were lined up on the floor acted as wicks, sucking up water until they were soaked. The owner had the fabric dried and sold it off cheaply by weight. I bought a lot of it figuring that I could use it for quilt backs if nothing else. (I washed it, of course.) I'm also using it to try out new patterns since it was cheaper than unbleached muslin and can actually be worn if the pattern turns out well.

At first I was considering the floral at the top of this post. But I regretfully concluded that the print is just too large. My second choice is this abstract print which would probably look okay with my black or white short sleeved tops. And the scale of the print is much more suitable.


Saturday, May 7, 2011

First Communion Dress -- Finished!


Yes, the dress was finished on time . . .


so that Granddaughter #2 could wear it on her very special day.


Here's a close up of the bodice:


(I had hoped that you'd be able to click on the photo to see the lace between the two groups of tucks, but Blogger doesn't want to co-operate.)

My favorite part of her outfit was the veil, something for which I can claim no credit whatsoever. It was made by a family friend for Granddaughter #1 who wore it the year before. Isn't that fabric gorgeous? My daughter-in-law says that her friend, who also makes vestments, mail ordered it. How I'd love to see the catalog!

And now it's time to confess. This is not the dress as I originally envisioned it. After buying 5 yards of white silk dupioni, after discovering new techniques for sewing with it, after learning how to alter the pattern for a custom fit, and especially after struggling with the washing and ironing issues, it became apparent that the learning curve was too steep for the time allotted. And this was one project that had to be finished on time.

So I ditched the silk and bought polyester satin at (blush!) JoAnn's.

Then the dress went together fairly quickly. I simplified the sleeve cuffs but otherwise left the pattern the way I'd planned. I wish, however, that I had made one other change. When I'd been planning to use the silk, I changed the skirt from a slightly gathered four-gore skirt with a curved hem to a dirndl with a deep, straight hem. I now think that the original A-line skirt would have been better suited to the fabric because the polyester satin was a bit too "springy" to be so tightly gathered.

The satin had its own problems, of course. For one thing, it had a tendency to fray even more than the silk. I used a serger to finish most of the seams and a product called Seams Great to finish the armhole. So everything was nice and clean inside.

My first invisible zipper went in without a hitch, thanks to Bernina's #35 foot. I think I'll use them more frequently from now on. They really are easier than regular zippers. No top stitching!

The dress had only two really visible problems. For some reason the sash kept riding up above the waistline despite the thread loops. The instructions said to place one end of the loops at the waist seam and the other 1 1/2" above it. Perhaps the one end of the loop should have been above the waist seam and the other below it. And, possibly due to the springiness of the fabric, the collar had a tendency to flip up a bit.

But my granddaughter seemed to like it which, as I reminded myself, is what was really important.

Making this dress has taught me a lot -- and not just about sewing. I realize now why having to switch my plans from stunning, heirloom frock to ordinary, nice dress upset me so much.

Although I do take a lot of pleasure in sewing for its own sake, I fear I'm also motivated by the show-off factor. The need to astonish others with my expertise and to inspire their admiration had begun to outweigh my original desire to please my granddaughter and to praise God with the work of my hands. Next time, I will aim for little less pride and a little more humility.

Thursday, May 5, 2011

Funny, You Don't Look Catholic!

A couple of weeks ago, the Change Oil light in my car lit up. Because it was a weekend, the place where I usually take it to was closed. So I went to Jiffy-Lube. The nice young man who checked my car (and tried to sell me additional services and products) seemed unusually nice and friendly. I probably would have thought it a bit odd if I hadn't been so eager to get back to the waiting room which had free Wi-Fi. So when he asked, "Do you go to Such-and-Such Apostolic Church?" I was caught off-guard.

"Excuse me?"

He repeated the name, adding, "It's Pentecostal."

"Um, no. I'm afraid I've never heard of it."

"Oh. I thought you might go there. I noticed the way you were dressed..." No wonder he'd seemed so friendly. He was probably a nice boy from that church and had mistaken me for one of the older ladies in his congregation.

"Actually," I said, "I'm Catholic," which is a sure-fire conversation stopper in so many situations.

As he printed out a copy of the work order for me, I looked down at my clothing. I was wearing a blue denim jumper made from Kwik Sew 2671, view A. I had omitted the bird house appliques, but it was otherwise just like the picture on the pattern envelope. I was wearing it with a black T-shirt, a pair of black stockings, and black shoes. Why did this mark me as Pentecostal? Is it the color of my outfit? The length? Its plainness?

I prefer quilting to garment sewing, but I am woefully in need of new clothes that I can wear to work. Most of my previous clothes either don't fit any more or are too shabby to wear in public. I have a part-time job as a library aide, so I need clothing in which I can stoop, squat, and reach up to the upper shelves both easily and modestly. I prefer skirts or dresses because I have to wear support hose, and they are much too hot to wear under trousers. And I need pockets!

I was planning to make another jumper -- same pattern, but in a lavender, fine wale corduroy. I hope it will look less Protestant. Maybe it will also help if I wear a crucifix or my medal of Our Lady of Guadalupe. (I don't want to be accused of false advertising!)


Tuesday, May 3, 2011

Silk or Not?

The fact that I'm having so much trouble ironing my fabric has really puzzled some of the sewing ladies I've consulted online. Silk dupioni should wash and iron like a dream, at least that's been their experience. One person wondered if perhaps I'd been sold a blend instead of 100% silk and suggested I do a burn test.

I'm familiar with testing for cotton, but had never tried silk. All of the sources I consulted seem to agree that silk "usually burns readily, not necessarily with a steady flame, and smells like burning hair. The ash is easily crumbled."

So I set up my tin foil lined pie pan and, using tongs, held a small piece of my fabric over the burner of stove. It did not catch fire very easily. In fact, it just seemed to char and then bubble up into a lump. Finally, it flamed. But when I dropped it into the pan, the flame went out. I expected the bubbly black mass to be hard and solid. But it was crunchy and easily crushed. But did it smell like burnt hair? How should I know? I mentioned my difficulty to Fillius, and he assured me that it definitely did.

"How do you know?" I asked. "When did you ever smell burning hair?"

"Well..."

There are some things that mothers never find out until their children are grown.

"I once burnt some hair when I was little. Just to see what would happen." I recalled then that he used to love playing with magnifying glasses when he was young.

"And, um, I accidentally burnt some of my hair by bending too close to the stove burner one time."

"Ah," I said and asked no more. Sometimes it's better not to know any details.

Monday, May 2, 2011

It's a Learning Process: Right Side or Wrong?

Last night a friend called to ask the dreaded question, "Is it done?" She was speaking, of course, of the First Communion Dress which I've been working on since February and which I'm supposed to be taking with me to Ohio this Thursday.

"Yes," I said. "It's done." As a matter of fact, I had put the last few stitches in it just moments ago. (I'd thought I had finished it a couple of days ago but had just realized that I'd forgotten to blind stitch the opening in the sash and the thread loops to hold it in place.)

"And was it fun?" she asked eagerly. I wasn't quite sure how to reply. This project has had more twist and turns, more set-backs than any other I've done in a long time.

"Well," I said carefully, "I learned a lot from it." That was certainly true, and I suppose it was all worthwhile -- even though many of the things I learned didn't end up being used in the final dress. Originally, I had hoped to document my progress, but ended up sewing too fast and furiously to be able to write about it. So I thought I'd do a few posts about the process and what I learned from it, now that I've had a chance to catch my breath.

Here is a picture of my beautiful silk dupioni on its way through my Bernina 1530. The more observant among you are probably wondering why I'm using a spool of green thread to sew white silk.

Well, I am marking the right side of my fabric. Never having worked with silk before, I realized that I had no idea which was the right side of the fabric. I could see a slight difference between them; I just wasn't sure which one was supposed to be on the outside of the garment.

So I took it to my heirloom sewing teacher, and she marked it for me with a pin in the selvage. When we were sewing our Heirloom Linen Shirts, she'd had us mark the right side with a few pins which we moved down the length of the yardage as we cut out the panels for various parts of the shirt. I couldn't quite see myself doing this with five yards of silk. (Especially since I wasn't planning to cut out all the pieces of the dress at one time.) But then I was struck with the idea of sewing the selvage edge with green thread on top and white in the bobbin. Then I would always know that the side with the green stitching was the right side. A minuscule brainwave, but mine own -- and an idea I'll use again the next time I have a fabric for which it would be easy to confuse the right side with the wrong.

Sunday, May 1, 2011

May Every Day -- A Month's Worth of Posts

I've decided to imitate Rebekah at St. Gemma's Art & Needlework: I have recklessly resolved to post every day in May. In her April 30th post Rebekah writes,
I wish I could say that I'd been only posting once or twice a week -- or that I had a long list of topics to write about. As my blogging has become more and more sporadic, that portion of my brain that governs writing has become increasingly wizened. I think I need to exercise that mental muscle before it becomes completely atrophied.

The Rules:

1) Because I have two blogs, I'm allowing a post to either one of them to "count" as my post for the day. If you have never visited it, Catholic Bibliophagist is where I write about books, libraries, and reading.

2) Because I've started a couple of days late, I'm allowing myself to play catch-up. (So I'm actually posting this May 1st post on the 2nd.) But I'm not going to beat myself up if I miss a couple of posts this weekend because I'm flying east this weekend for a granddaughter's First Communion.